Your Cart is Empty
Get Free Shipping over $59 within the U.S. | Woohoo!
- Home
- Inspiration
- Shop
- Wedding Shop
- Contact
- NEW 90 Gram Crepe Paper
- 888 284 6532
- Login
- USD


Hello!
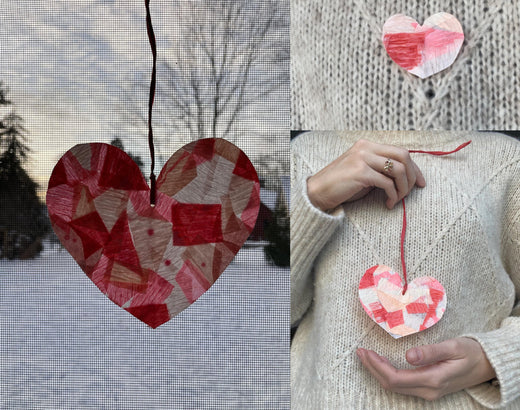
I am so excited to share this super simple project with you for Valentine’s Day! These “stained glass” hearts are such a quick and easy way to add a little extra love to your day! If you are like me, then you have a huge collection of crepe paper scraps from past projects. These hearts, utilize those otherwise discarded bits to make something beautiful. In fact, I have even recycled wax paper from previous project! Now, let’s have some fun!
You will need:
Gather your materials and prepare your paper by stretching out any 180g crepe you have. This is not necessary for 60g and 90g crepe. Once the 180g is stretched, cut all your scraps into a rough confetti. It can be as fine or as chucky as you like. There are no wrong sizes or shapes! It is, however, nice to have a mix of different crepe paper weights in your confetti. The finer the paper (60g, 90g) the more light will pass your “stained glass” heart. The heavier the paper (180g) the darker the area will look in the final result. You can see here that the wax paper I used is recycled from an old project. It has speckling from staining paper, but that will only add interest to the final result!

To begin, place your wax paper on a sheet pan and pour a generous amount of Mod Podge onto it. The sheet pan is not essential to complete this project. It is simply a tool I use to contain my messier projects.
 Use a paintbrush to spread the Mod Podge into a square of any size. I found a square that fits about half a sheet pan is manageable. It is important that this layer of Mod Podge is not too thin or it will dry before the next step.

Reach into your crepe paper confetti and arrange the pieces on the Mod Podge square. Press down each piece as you go to stick it to the wax paper. If you find that the Mod Podge is drying up in this process and the paper is not sticking, just as more mod Podge! The idea here is to cover every inch of the Mod Podge square. You can overlap paper or not! You choose! If you want to have sections of just wax paper, that is great! You decide what looks interesting!

Continue this process until the entire Mod Podge square is covered in your paper confetti design!

Next, cover the entire surface of your crepe confetti design with more Mod Podge. Use a blotting motion with your paintbrush so as not to disturb your design. Be very generous with the amount of Mod Podge used in this step! Allow the Mod Podge to complete dry before moving to the next set. I let mine dry overnight and came back to the project the following morning.

When the Mod Podge is dry, remove your design it from the sheet pan, if you were using one, and head to your workstation! The glossy finish of the dried Mod Podge adds a lovely sheen to the crepe and helps make the thinner crepe (60g, 90g) more translucent!

Use your favorite scissors to cut out your crepe square and discard any extra wax paper. Better yet, use these scraps for your next “stained glass” heart!

To make your heart, fold the square in half.

Use your scissors to cut out a heart shape. This project is all about having fun, letting go and making something beautiful quickly, so let go of trying to make the “perfect” heart. Instead of drawing a heart shape first, just go for it!

You are likely able to cut a few hearts from one crepe paper square. Once your main heart is cut, fold different areas to find enough material to cut more hearts! I managed to cut three of my square.

If you want to add a little extra flair to your “stained glass” hearts, you can tie a ribbon for hanging. You can do this by using the tip if your scissors to punch a hole in the top of the hearts. You could also use a hole punch if you have one on hand.

Thread your ribbon through the hole. Tie a knot and trim the excess ribbon for a neat finish.

Hang or tape your hearts from a window or a doorway. Use them as a personalized gift tag for your Valentine or glue them to a pin and wear your handmade heart on your sleeve!

Comments will be approved before showing up.